fundamental
Setup the project environment with Typescript, webpack, and three.js
Github Repo: https://github.com/happyeric77/three.js-fundamental.git
- Repo branch: webpack-env
There are three key packages by which we can setup the project environment
- webpack (including
webpack,webpack-cli,webpack-dev-server,ts-loader,webpack-merge) - typescript
- three.js
- install packages
npm install
- Start dev server
npm run serve
Basic components of three.js
- Repo branch: 2.camera-scene-renderer
OrbitControls: to have interactive canvas with mouse and keyboard
import { OrbitControls } from "three/examples/jsm/controls/OrbitControls";

const control = new OrbitControls(camera, renderer.domElement);

control.addEventListener("change", () => renderer.render(scene, camera));
OrbitControls object allows us to control the camera with mouse and keyboard. when the mouse event happens, the renderer will re-render the scene.
Scene: where to place objects, lights and cameras.
const scene = new THREE.Scene();
Camera:
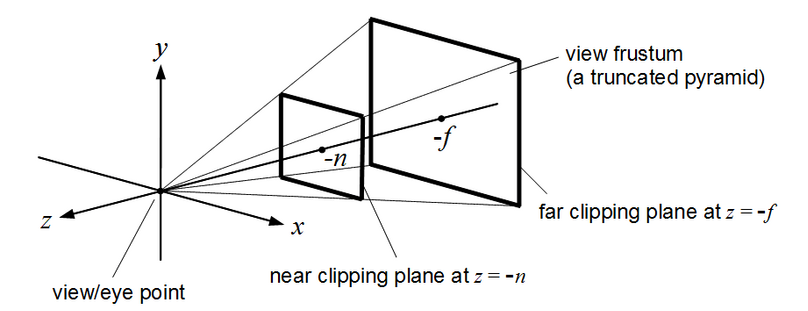
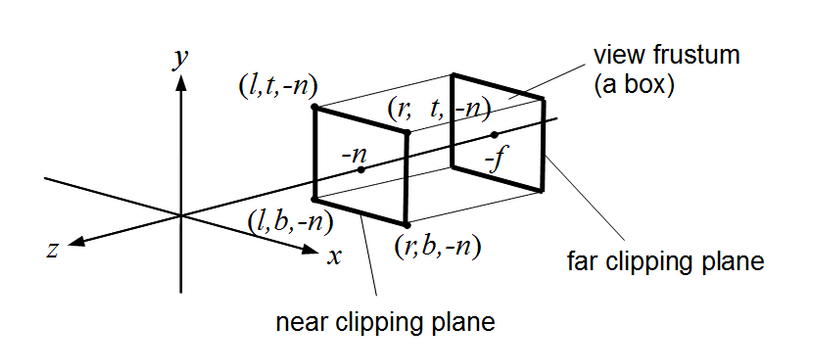
const camera = new THREE.PerspectiveCamera(
  75, // field of view
  window.innerWidth / window.innerHeight, // aspect ratio
  0.1, // near clipping plane
  1000 // far clipping plane
);
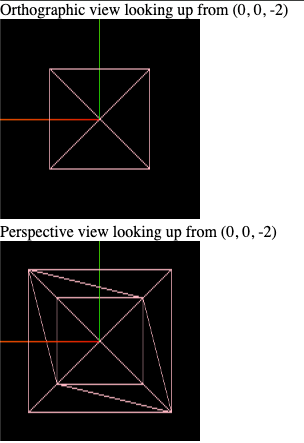
By using PerspectiveCamera, we can have a 3D perspective view. It means what we see is not a flat image, but a 3D image depending on the FOV of the camera.
Another type of camera is OrthographicCamera, which is a flat image.
In the example project, we are able to see the difference between using PerspectiveCamera and OrthographicCamera
Renderer:
// Default renderer, which is WebGLRenderer. The fastest and most supported one.
const renderer = new THREE.WebGLRenderer();

renderer.setSize(window.innerWidth, window.innerHeight);

document.body.appendChild(renderer.domElement); // renderer.domElement is a HTMLCanvasElement
Above, wwe use append child to add the canvas to the body of the document. Sometimes, we may want to bundle the canvas into a html element. We can
- create a canvas element in html
<!-- index.html -->
<!-- ... -->
<head>
  <style>
    /* ... */
    #c1 {
      width: 100%;
      height: 100%;
    }
  </style>
</head>
<body>
  <canvas id="c1"></canvas>
  <!-- ... -->
</body>
- use
document.getElementByIdto get the canvas element
const canvas = document.getElementById("c1");
const renderer = new THREE.WebGLRenderer({ canvas });
Animation Loop
There are two ways to animate the scene
- use
requestAnimationFrameto call the animation function recursively
const animate = () => {
  requestAnimationFrame(animate);
  cube.rotation.x += 0.01;
  cube.rotation.y += 0.01;
  cube.rotation.z += 0.01;
  renderer.render(scene, camera);
};
- use
renderer.setAnimationLoopto set the animation loop
renderer.setAnimationLoop(() => {
  cube.rotation.x += 0.01;
  cube.rotation.y += 0.01;
  cube.rotation.z += 0.01;
  renderer.render(scene, camera);
});
Util
- Repo branch:
3.utils-stat-dat.gui
stat panel
import Stats from "three/examples/jsm/libs/stats.module";

const stats = Stats();
document.body.appendChild(stats.dom);
Then we can see the empty panel on the top left corner of the canvas. To make it work, we need to call stats.update() in the animation loop.
const animate = (render: THREE.WebGLRenderer) => {
  requestAnimationFrame(() => animate(render));
  stats.update();
};
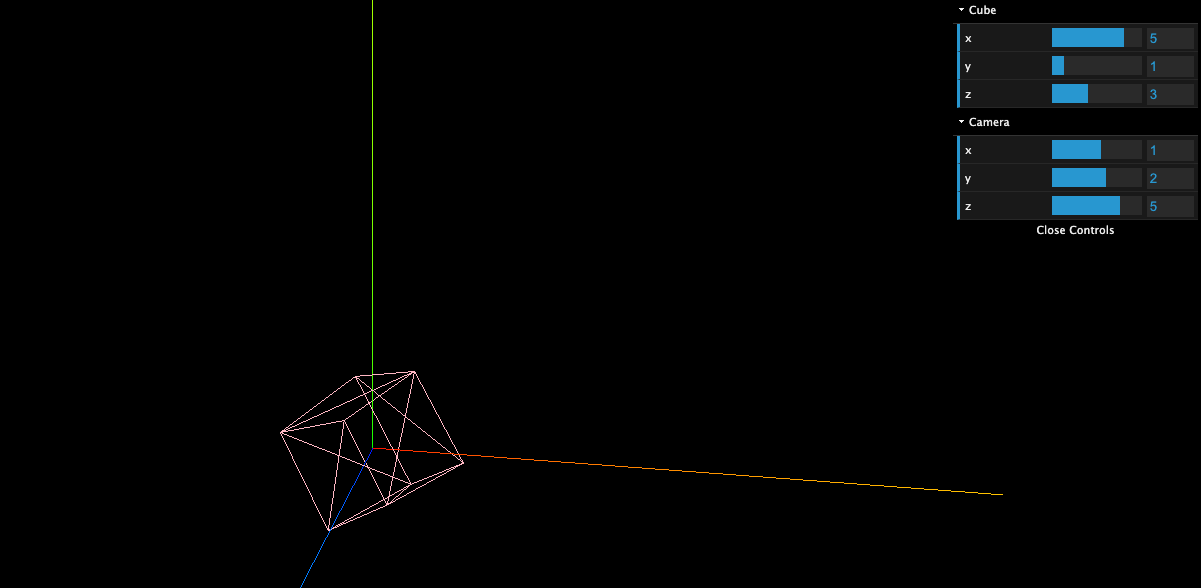
dat.GUI
dat.GUI is a lightweight controller library for JavaScript. It allows us to control the variables in the scene.
It is not a tool specifically for three.js, we can use it in any JavaScript project to control the object's properties.
Firstly, we need to install the package
npm install dat.gui @types/dat.gui --save-dev
In the example project, we use dat.GUI to control
cute.rotationpropertycamera.positionproperty
import * as dat from "dat.gui";

const gui = new GUI();
const cubeFolder = gui.addFolder("Cube"); // create a folder called Cube
cubeFolder.add(cube.rotation, "x", 0, Math.PI * 2);
cubeFolder.add(cube.rotation, "y", 0, Math.PI * 2);
cubeFolder.add(cube.rotation, "z", 0, Math.PI * 2);
cubeFolder.open(); // open the folder by default
const cameraFolder = gui.addFolder("Camera");
cameraFolder.add(camera.position, "x", -10, 10);
cameraFolder.add(camera.position, "y", -10, 10);
cameraFolder.add(camera.position, "z", -10, 10);
cameraFolder.open();
Then we will see the GUI panel on the top right corner of the canvas.
Object3D
- Repo branch:
4.object3d
Object3D is the base class for most of the three.js objects. It provides a lot of useful methods and properties. ex. add, remove, position, rotation, scale, ...etc.
we need to be careful about the object hierarchy when we use
addto create a parent-child relationship. If we add a child to a parent, then the child's position, rotation, scale will be relative to the parent.
To get the world position, rotation, scale of an object, we can use getWorldPosition, getWorldRotation, getWorldScale methods.
const objectsWorldPosition = new THREE.Vector3();
object.getWorldPosition(objectsWorldPosition);

const objectsWorldDirection = new THREE.Vector3();
object.getWorldDirection(objectsWorldDirection);

const objectsWorldQuaternion = new THREE.Quaternion();
object.getWorldQuaternion(objectsWorldQuaternion);

const objectsWorldScale = new THREE.Vector3();
object.getWorldScale(objectsWorldScale);
Geometry & transform matrix
- Repo branch:
5.geometry-transform-matrix
There are 6 main properties of Geometry object:
- width
- height
- depth
- widthSegments
- heightSegments
- depthSegments
We can change the shape of the geometry by changing these properties.
NOTE:
We can also use Object3D.scale to change the size of the geometry. But it will change the size of the geometry and its children as scale uses the transfrom matrix to change the size of the object.
We can check out the transform matrix of an object by using matrix property.
const transformMatrix = cube.matrix;
Material
- Repo branch:
6.material
Material is used to define the appearance of an object. There are many types of materials in three.js. ex. MeshBasicMaterial, MeshNormalMaterial, MeshLambertMaterial, MeshPhongMaterial, MeshToonMaterial, MeshStandardMaterial, MeshPhysicalMaterial, MeshMatcapMaterial, MeshDepthMaterial, `MeshDistance
We will explain some of them in separate sections.
In this section, we simply introduce some common properties of material.
- transparent: whether the material is transparent or not
- opacity: the opacity of the material
- alphaTest: the alpha test value of the material (a threshold value)
- side: which side of the material will be rendered. ex.
THREE.FrontSide,THREE.BackSide,THREE.DoubleSide
MeshBasicMaterial
- Repo branch:
6.1.MeshBasicMaterial
This is the most basic material. It is not affected by light. It is not affected by shadows. It is not affected by any other objects in the scene. We can use it when we want to create a simple object without setting up complicated lightings.
There are some properties we can set for MeshBasicMaterial:
- color: the color of the material
- wireframe: whether the material is rendered as wireframe or not
- reflectivity: the reflectivity of the material (only take effect when .mapping is set as THREE.CubeReflectionMapping[default])
- map: the texture map of the material
- envMap: the environment map of the material
- combine: the operation to combine the texture map and the environment map (default is THREE.MultiplyOperation)
MeshLambertMaterial
The property of MeshLambertMaterial is affected by light. It is more for matte objects such as wood, stone that are not shiny.
We can use emissive property to make the object glow without light.
TODO add detail
MeshPhongMaterial
It is useful when we want to create a shiny object. ex. polished wood
Addition to the emissive property, we can also use specular and shininess properties to make the object more shiny.

TODO add detail
MeshStandardMaterial
It uses the PBR (Physically Based Rendering) model to render the object. It is more realistic than MeshPhongMaterial.
More computationally expensive than MeshPhongMaterial & MeshLambertMaterial
It provides flatShading, roughness and metalness properties to control the appearance of the object.
It is kind of similar to MeshPhongMaterial, but it is more realistic.
MeshPhysicalMaterial
It is an extension of MeshStandardMaterial. It provides more properties for reflectivity.
Addition to reflectivity and refractionRation, we have clearcoat, clearcoatRoughness properties.
MeshMatcapMaterial
It is a material that uses a texture map to define the color of the object. It is not affected by light.
MeshToonMaterial
Toon shadding is a non-photorealistic rendering technique. It is a cartoon-like rendering style.